
Before exporting to QuickBooks Online, first complete the QuickBooks Online Setup Instructions in this section of the support docs. Once that is done, continue below.
Create a Dataset for Export
Begin the export process by visiting the Export form and selecting the data to export using the available filters.
- Click Reports in the left menu.
- Under the Export to QuickBooks Online heading, select Project Timesheets.
- Set the export dates and other parameters/filters for the specific data you’d like to send to QuickBooks Online and click Export to QuickBooks Online to continue.
Review your Data
Timesheets.com will display a report with the time that match your selected criteria. Review the data carefully prior to export to ensure all your data is included. Each line item should have a checkbox along the left side of the report. You may deselect any specific line items you do not wish to export by unchecking the appropriate box.

Export your Data
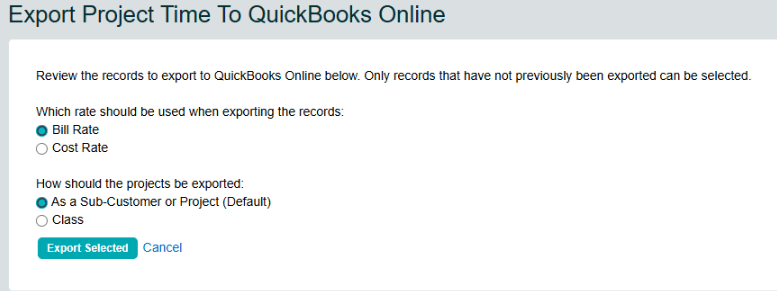
Timesheets.com supports both a bill and a cost rate while QuickBooks Online only supports a bill rate for recorded time. As a result, when exporting time, admins can choose to specify which field (the Bill Rate or the Cost Rate) is imported into the QBO weekly timesheet. Regardless of which rate option is chosen to export from Timesheets.com, the selected option will always import to the Weekly Timesheet as the Bill Rate.
The second export option determines whether the Project field maps to the Sub-Customer, Project, or Class.
When your ready to export, click the final Export Select button at the top of the report to send your data to the weekly timesheets in QuickBooks Online. Depending on the size of the export, it may take several minutes to complete. To review progress on your export, click the Previous Exports tab at the top of the page and focus on the top line of the resulting data table to see details of your latest export. Refreshing the page will refresh the status of the export. Once complete the export will display a status of Completed or Failed depending on the results.
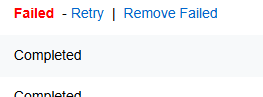
Failures
When items fail, you’ll typically need to correct a data mismatch issue between the two services. Check out the Troubleshooting page in this section of the Help Docs for instructions.