If you are using Timesheets.com with QuickBooks for the first time we encourage you to contact us for help with getting your integration set up!
Table of Contents
- System Requirements
- Installing Import Software on Your PC
- Setting Up QuickBooks to Recognize Timesheets.com Data
- Setting Up Timesheets.com Employee Numbers and Time-Off Payroll Items to Match QuickBooks
- Setting Up the Timesheets.com Importer
- Data Map
1. System Requirements
- Administrative access to QuickBooks
- Administrative access to Windows (QuickBooks does not support Mac)
- Administrative access to Timesheets.com
- Ability to access QuickBooks in Single User Mode
2. Installing Import Software on Your PC
- In Timesheets.com, click the gear wheel icon in the upper-right, then click Company Settings. Navigate to the Data Export tab, and click the QuickBooks Desktop Importer link.
- Click the Download QuickBooks Importer Setup File link.
- There are two files inside the compressed file you will need to install:
- QBFC11 file
- Timesheets Setup file
- Run and install both files with default settings. Note: You must have the QuickBooks company file open in QuickBooks while you complete the installations of both files.
- When complete, you should see a new icon on your desktop that looks like the icon below. This is the importer app and you will use it when you’re ready to import your data.

3. Setting Up QuickBooks to Recognize Timesheets.com Data
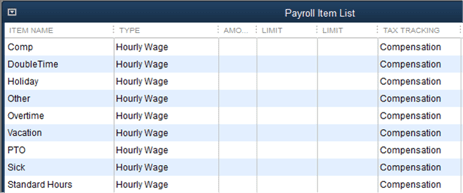
Begin by navigating to the QuickBooks Payroll Item list. You may enter payroll items for standard time, overtime, double time, and up to 6 types of time off. You can name them however you like. Here is a sample payroll item list:
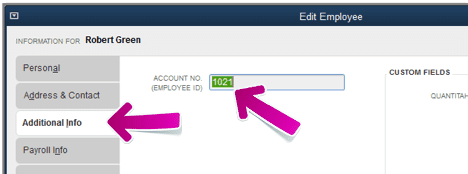
Each employee in QuickBooks must have the same employee number in Timesheets.com. Navigate to the Employee Center. Edit each employee and select the Additional Info tab. Locate the Account Number and enter a unique number for the employee in that field.
Special Case: Importing Time to Vendors
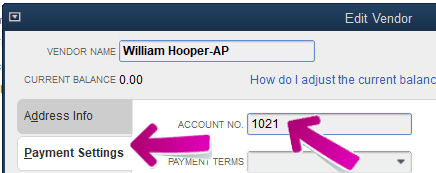
If the user in QuickBooks is a vendor (such as a contractor) then enter the unique number on the Payment Settings tab in the Account Number field for the vendor. Note that if you have a vendor and an employee with the same account number, then time will be written to the employee’s timesheet in QuickBooks, not the vendor’s timesheet.
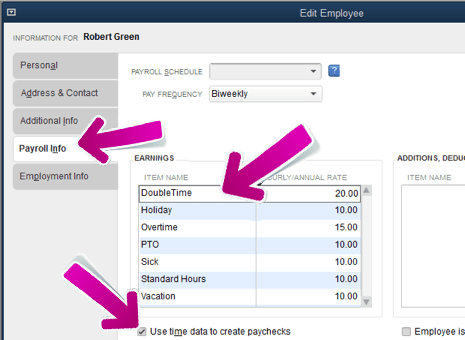
Next, select the Payroll Info tab for each user and enter the necessary Payroll Items in the Earnings table as seen below. Check the box below the earnings table that reads, Use time data to create paychecks.
QuickBooks requires a service item for each imported hourly time entry. Account Codes in Timesheets.com are equivalent to Service Items in QuickBooks, so any Account Codes that are used in Timesheets.com must also be created in QuickBooks as Service Items in order to import time. (Also note that list items can be up to 41 characters, including blank spaces.)
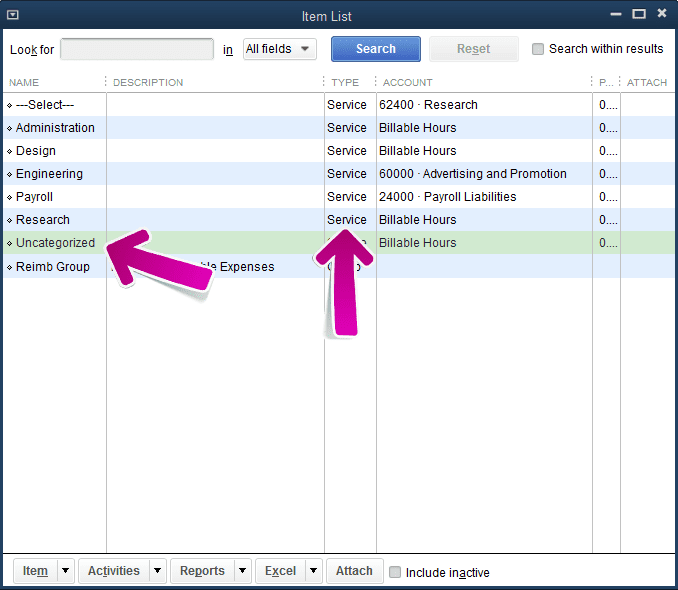
If you don’t use Account Codes for time tracking, you’ll still need at least one. The default value in Timesheets.com is “Uncategorized”. Create this service item in QuickBooks.

4. Setting Up Timesheets.com Employee Numbers and Time-Off Payroll Items to Match QuickBooks
In Timesheets.com, navigate to each employee’s settings by clicking the ![]() gear wheel icon to the left of their (name from the dashboard). Then, navigate to their Options tab and enter the same number from the QuickBooks setup into setting 1 so that an employee or vendor in QuickBooks has the same number in Timesheets.com. This ensures that time is imported into the proper timesheet in QuickBooks.
gear wheel icon to the left of their (name from the dashboard). Then, navigate to their Options tab and enter the same number from the QuickBooks setup into setting 1 so that an employee or vendor in QuickBooks has the same number in Timesheets.com. This ensures that time is imported into the proper timesheet in QuickBooks.

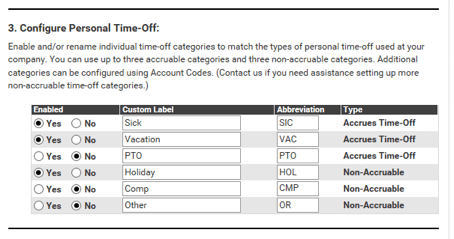
Next, navigate to the Setup Wizard and select the Hourly tab. Scroll down to section 3. Make sure the Custom Labels for time off match your existing Payroll Items as listed in QuickBooks.
Timesheets.com sample view:
5. Setting Up the Timesheets.com Importer
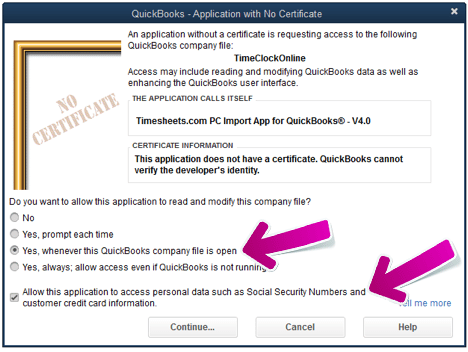
To set up the importer, put QuickBooks in Single User Mode. Double-click the desktop icon installed in step 1 to start the importer. Running the importer for the first time will prompt QuickBooks top open a dialog box asking for permission to install the software.
- Select the 3rd option, Yes, whenever QuickBooks company file is open.
- Check the box next to Allow this application to access personal data… (This option is necessary because the payroll module contains personal information.)
- Click Continue and follow the prompts to complete the process.
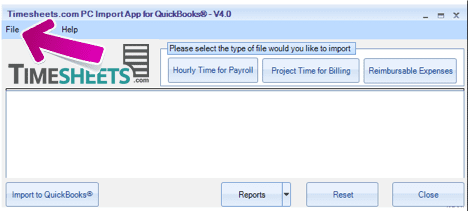
Click to the File menu of the importer application, and then click settings.
Enter the Payroll Item values into the fields and click Save. If you’re not using all 9 fields, copy the value for 1.0x Item Name (“Standard Hours” in this example) to the unused fields so that they are not left blank.
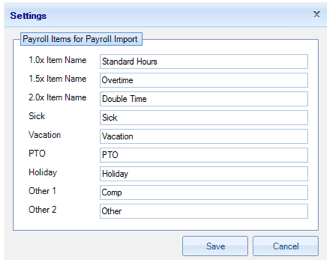
You are now ready to import your data into QuickBooks.
Tips
When importing time where the Account Code is translated to Class, there are two Preferences settings that must be properly configured in QuickBooks.
- In the Accounting section, on the Company Preferences tab, the Class section must be enabled. Check the box that reads, Use class tracking…
- In the Payroll & Employees section, on the Company Preferences tab, the Job Costing, Class and Item box must be checked and classes must be assigned per Earnings item. Without this setting, the classes column will not display on the weekly timesheet.
6. Data Map
| In Timesheets.com | In QuickBooks Desktop |
| Account Code | Options: Service Item Payroll Item Class Customer |
